Ever wondered why some games seem more realistic than Minecraft? It’s all about intentional map design, guiding players to visually pleasing elements with carefully placed blocks. In Minecraft, the responsibility falls on you to create captivating scenes. The introduction of new Path/Raytraced shaders in Minecraft brings a plethora of extraordinary features, yet many players fail to fully grasp their potential. Steer clear of the mundane – avoid uninspiring Minecraft landscapes, generic clouds, or clichéd sunsets. This guide is dedicated to unveiling the incredible capabilities of shaders like SEUS PTGI. We will teach you how to take better Minecraft screenshots!
Does reality always look realistic? While real life tends to be realistic, achieving visual perfection requires strategic choices by professional photographers. Similarly, in Minecraft, you play the roles of “Minecraft Builders” and “Minecraft Photographers” to build stunning buildings and capture better screenshots.
How To Take Screenshots
For Java Edition on Windows:
- Press F2 to effortlessly take a Minecraft screenshot. Tip: Press F1 to remove the GUI and HUD for better screenshots. Also, we recommending to press F11 to enter fullscreen mode.
- Press the Windows key.
- Navigate to your AppData folder by pressing the Windows key, typing ‘%appdata%’, and hitting enter.
- Open the .minecraft folder, followed by the screenshots folder, and voila – your Minecraft memories await!
If the standard F2 key isn’t working due to your keyboard configuration, fret not. For some keyboards, especially those lacking dedicated F keys, you might need to press FN and F2 simultaneously. Just experiment to find what works for your setup.
For Bedrock Edition on Windows:
- Open the Windows game bar by simultaneously holding down the Windows button and G.
- Choose the camera icon within the game bar for a quick screenshot. Alternatively, press the Windows button, Alt, and Prtscn (Print Screen) together.
- Your Minecraft screenshots should automatically be added to your PC’s pictures gallery. Simply check your pictures folder, and you should find your new Minecraft screenshots there.
For Java Edition on Mac:
- Press Shift, Cmd, and 4 simultaneously to capture a full-screen screenshot, conveniently saved on your desktop.
Decoding Screenshots
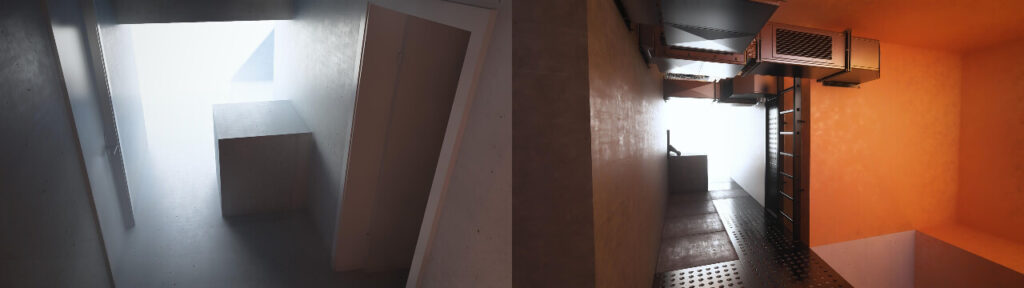
Let’s delve into two of our Minecraft builds/scenes, unveiling the methods and reasoning behind them. We are excited to introduce a fresh approach to Minecraft building, reminiscent of crafting images in 3D rendering software. The beauty? No need for 3D models or waiting for images to render. Just strategically placing blocks and we can walk around in our environments while we design them. By the way, we used in our screenshots a realistic texture pack for Minecraft.
Good Buildings for Minecraft Screenshots
Keep it simple and small. Avoid sprawling castles or cities. Each block should have a purpose. Start with a basic scene – a tiny box – then expand gradually, only adding elements that enhance the classic Minecraft aesthetics. Overdoing it can shatter realism; if something looks off, remove it. Less is more. Place a few blocks, pause, evaluate, and continue. Also, use a fixed sun angle with the chat command “/gamerule doDaylightCycle false”.
Perfect Lighting in Minecraft
Both screenshots share an identical lighting setup: a bright, white light source at the image’s center. But what is this light source? It’s not a lamp or direct sunlight; it’s indirect Minecraft sunlight. At the end of the hallway, an exterior wall made of white concrete is directly illuminated by the sun. The sunlight bounces off the wall and then bathes the hallway in soft, complex shadows. This is a Global Illumination, achievable only with Ray/Path-Traced shaders. So we recommend downloading Minecraft shaders if you want to take realistic screenshots.
Realistic Reflections
Once we established the light source, we strategically positioned a few blocks in the virtual hallway, driven by two crucial factors: Soft shadows and realistic reflections. In both screenshots, a single block in the hallway casts beautifully soft shadows. The light source also induces reflections on the walls, ceiling, and floor, making these hallways a reflection haven.
Diversify materials for distinct reflection types: matte concrete, rough concrete, polished concrete, metallic surfaces, dirty and clean surfaces, bumpy and smooth textures, beveled or flat – the choices abound. Our Minecraft textures require specific utilization. Blend different materials that reflect light uniquely. For instance, in the first screenshot, the walls are rough and matte, while the white doors exhibit a smoother surface. In the second screenshot, the concrete floor appears rough and dirty, while the metal plates are shiny, smooth, and metallic. Every element, from ladders to ventilation ducts, contributes to the symphony of realistic reflections in Minecraft.
Taking Good Screenshots in Minecraft
Now that we’ve created a perfect Minecraft build, the next step is sharing it, right? You snap a few screenshots, but somehow, they don’t quite capture the in-game allure. Ever wondered why? Well, it’s time to tap into some basic photography skills. The key lies in uncovering interesting camera angles.
Consider the two screenshots below – same Minecraft map, same scene, same shader, same settings, and yet, the one on the left stands out. What’s the secret? It’s the camera settings – the angle, position, POV, and more. Even a simple white room can become intriguing with the right camera perspective.
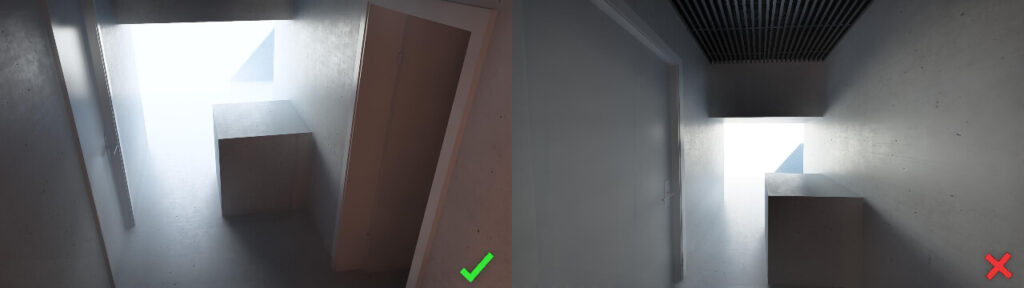
Changing Your POV in Minecraft
You need to change your Point of View (POV) to around 40-50. Lower POV values lend a more “professional” or “cinematic” feel to your Minecraft screenshots.
Forget about strict rules; it’s all about intuition. Experiment with different angles, move around and capture shots from various positions. Change your POV, take a multitude of screenshots, and then engage in a side-by-side comparison. Step back, squint your eyes, or look out the window before examining them objectively. Over time, you’ll develop a sense of what looks “professional” or aligns with your vision. You’ll create much better screenshots in Minecraft in the future.
Basic Tips for Good Minecraft Screenshots
- Focus on a single primary point of interest, like the reflections described earlier. Avoid placing it dead center; seek intriguing camera angles.
- Say no to symmetry. Embrace a bit of variation for a more natural look.
- Capture screenshots from a slight angle to reveal all three block faces clearly. More 3D textures enhance the image.
- Depending on the scene, tilt your Minecraft camera slightly up or down to avoid excessive straight vertical lines.
- Avoid taking screenshots with the sun directly behind you.
