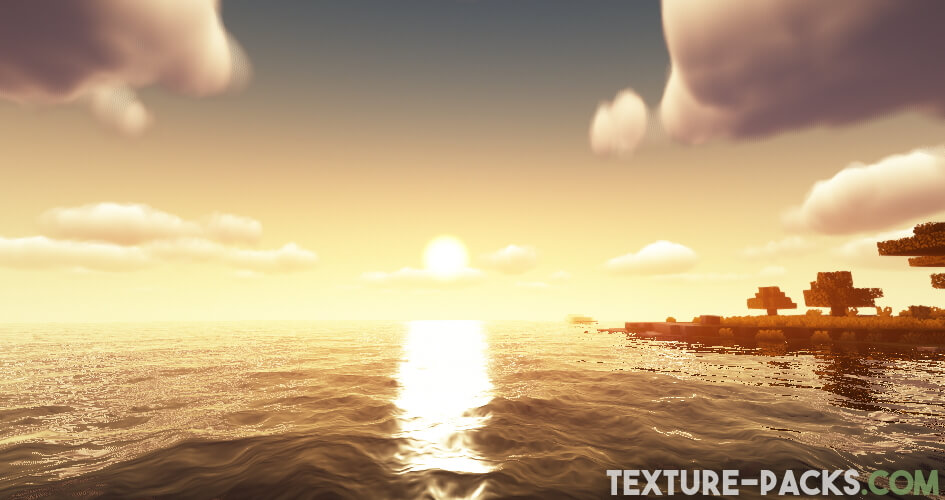
Picture this: a sun-kissed horizon painted with hues of crimson and gold, rippling waters reflecting the majestic mountains, and shadows dancing playfully as the sun sets behind the trees. It’s not a dream; it’s the breathtaking realism brought to you if you download the AstraLex shaders for Minecraft. We’ll equip you with essential knowledge on how to download and optimize these shaders to suit your unique gaming setup. Whether you’re an expert or a noob, this guide is tailored just for you.
In the past, numerous Minecraft players encountered issues with the BSL shaders. To address this, a modified version called AstraLex shaders was introduced. Originally referred to as BSLex, the name change was necessary to avoid confusion among users, ensuring they understood the distinction between the two packs. It’s important to note that the creator LexBoosT of the BSL edit sought permission from the main developer CaptTatsu before making changes to the programming code. That’s a practice that should be followed when working with others’ work, such as textures in a resource pack.
Unlike BSL, this pack offers a plethora of modification options. The best part is that no programming skills are required, as everything can be easily configured within the shaders menu.
AstraLex Shaders Features
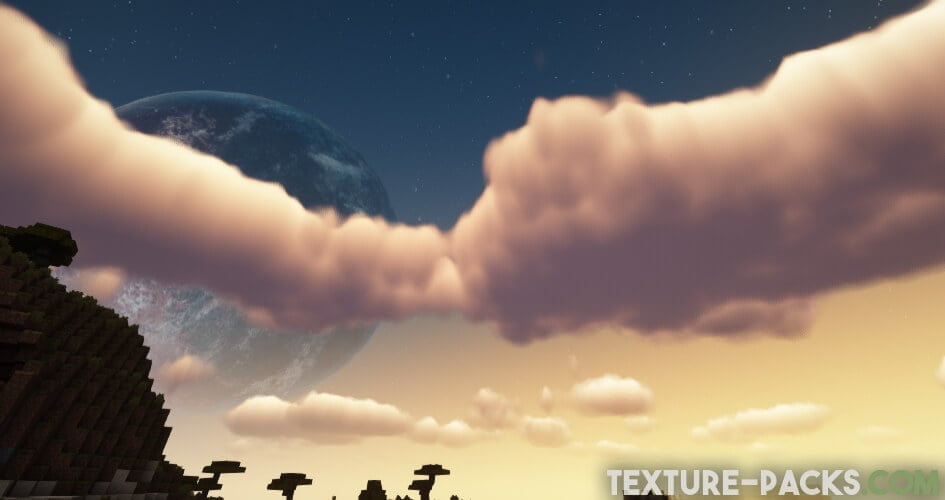
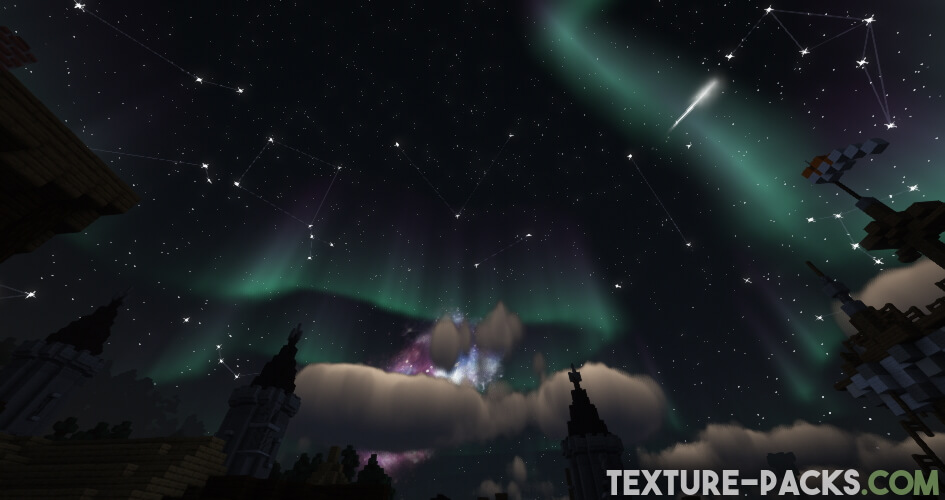
To begin your fun with AstraLex shaders, head over to the official download links at the end of the article, where you can download the files with just a few simple clicks. One of the standout features is the realistic nighttime scenery. You can enjoy the celestial beauty of the Minecraft night sky, complete with northern lights, shooting stars, and constellations. If you’re not a fan of these cosmic displays, don’t worry! AstraLex offers extensive customization options.
As the Minecraft weather takes a turn in your world, you’ll witness another delightful effect – the clouds closing up during storms. This seemingly small detail makes all clouds extremely realistic. And speaking of rain, when it drizzles, puddles form on the ground and reflect the surrounding environment. On top of that, from swaying plants to rustling leaves, the AstraLex shader pack makes many Minecraft blocks dynamic.
One fun and unique feature is the addition of black bars on the top and bottom of your screen when you sneak. It gives Minecraft a cinematic touch, resembling those cinematic bars you see in movies. Another unprecedented addition we’ve never seen in Minecraft shaders before is the presence of animated birds in the sky. Yes, you heard it right! When you activate the ultra profile, you’ll be delighted to see these delightful avian animations soaring above you.
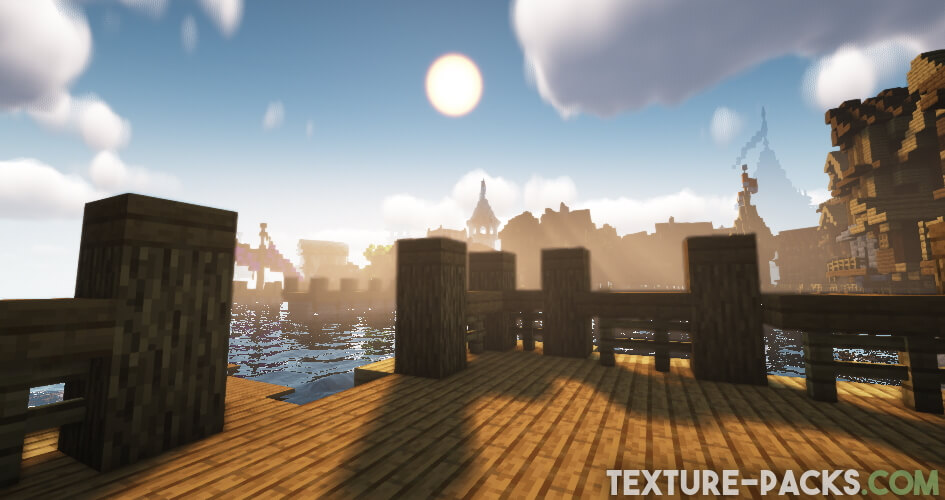
Upon downloading and installing AstraLex shaders, you may notice a unique visual style reminiscent of the Borderlands game series. Don’t be alarmed; this distinct look is not a flaw but rather a signature feature of the pack. If you prefer more classic Minecraft graphics, fret not; we’ll share our recommended settings later in the article.
Compatibility
AstraLex primarily targets users with less powerful computers, as the shader is comparably resource-efficient. This ensures compatibility with major graphics card brands, including AMD, NVIDIA, and Intel, allowing users on Windows, Linux, and macOS platforms to enjoy it. This is particularly advantageous for Apple users, as shaders typically don’t perform optimally with Mac hardware.
According to a survey, most players experience over 500 FPS in Minecraft with AstraLex, a truly remarkable feat. If you possess a high-performance computer, the possibilities are likely even greater. We encourage you to share your FPS count in the comments section; we’d love to hear about your experiences!
Best Settings for AstraLex
Ah, the moment you’ve been waiting for – the key to unlocking the true potential of AstraLex shaders! Let’s break down the best settings for the pack if you play on a PC.
First, load up AstraLex shaders and open up a world. Check your FPS by pressing F3 and looking at the top left. Start by going to options, video settings, and changing graphics to fast. Set smooth lighting to the minimum and make sure the FPS is set to unlimited. Then, go to performance settings and turn on render regions, fast render, and fast math.
Now, go to detail settings and set trees to fast while turning off clouds. Moving on to the shader menu, go to the shader options at the bottom right and set the profile to low. This preset is ideal if you want to increase the FPS. If you want to improve the realism instead, choose a different profile.
In the visual tab, go to advanced materials, click on reflections, and turn off all reflections. Then, head to cell shading, click on BSL cell shading, and turn off the black outline. Next, navigate to post-processing and turn off the bloom, motion blur, and lens flare. In the sky clouds configurations, make sure to turn off clouds. Now, go to hands and cam movement and disable all movements for better performance.
That’s it! With these settings, you should see a noticeable increase in FPS with the AstraLex shaders. We hope you found this tutorial helpful. If you have any questions, let us know in the comment section. And don’t forget to tell your friends about our website!
Video & Screenshots
Comparison
Use our comparison tool to compare the Minecraft default pack with AstraLex.
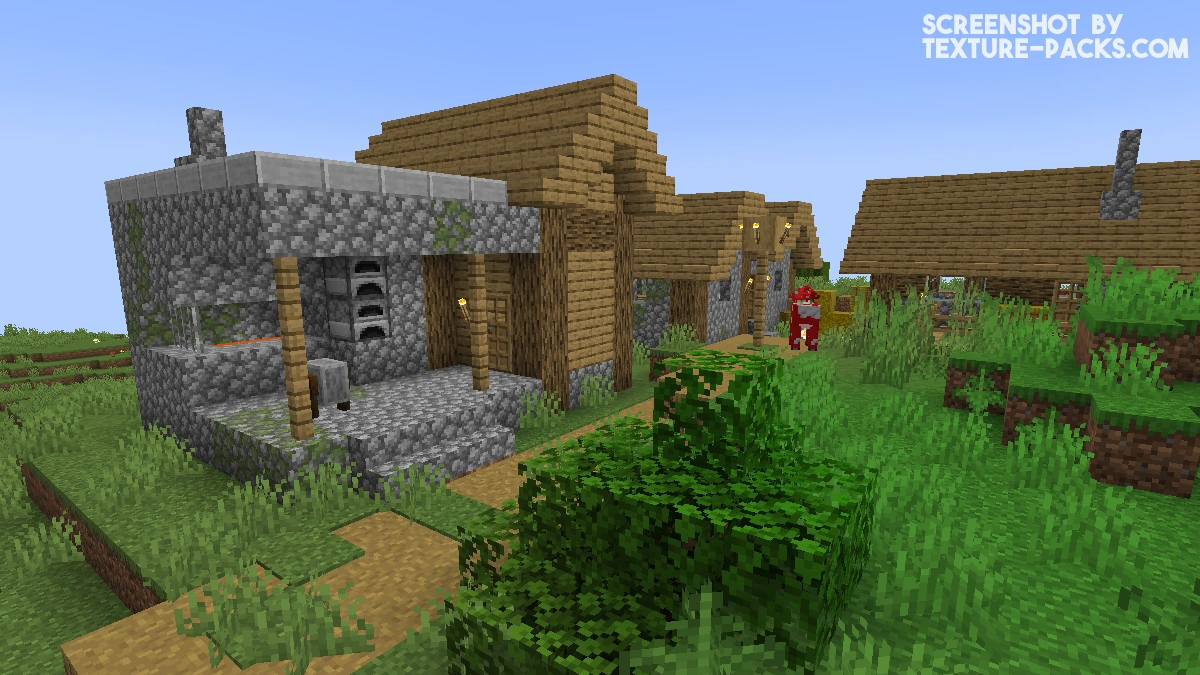
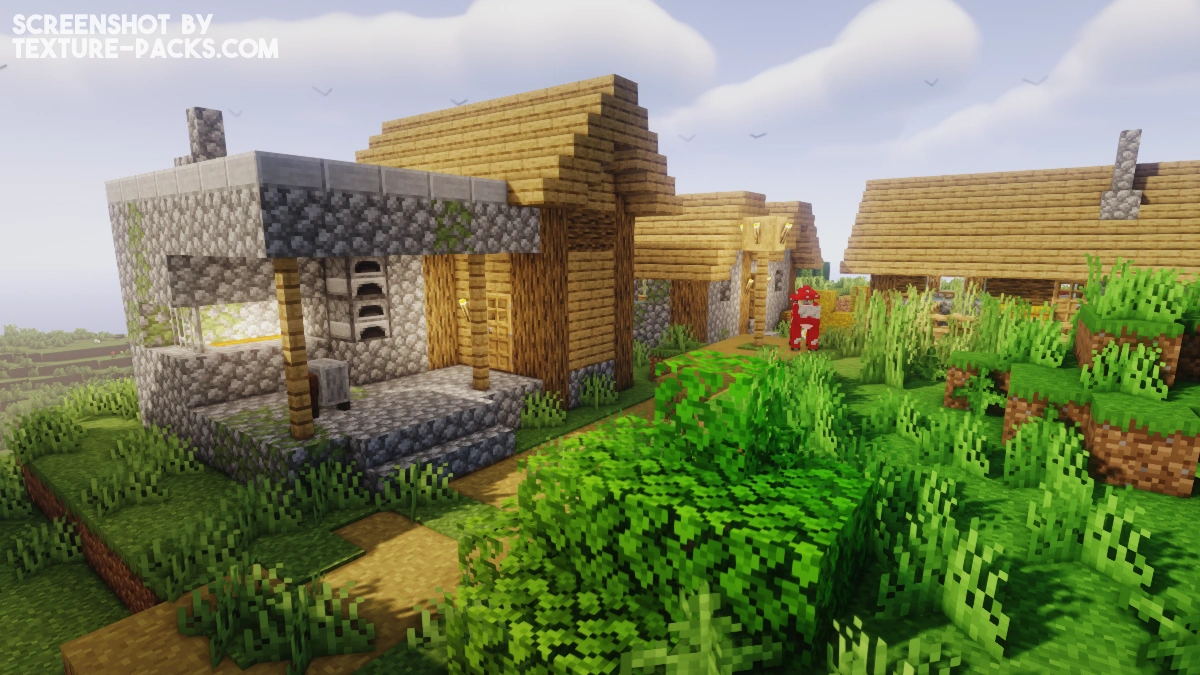
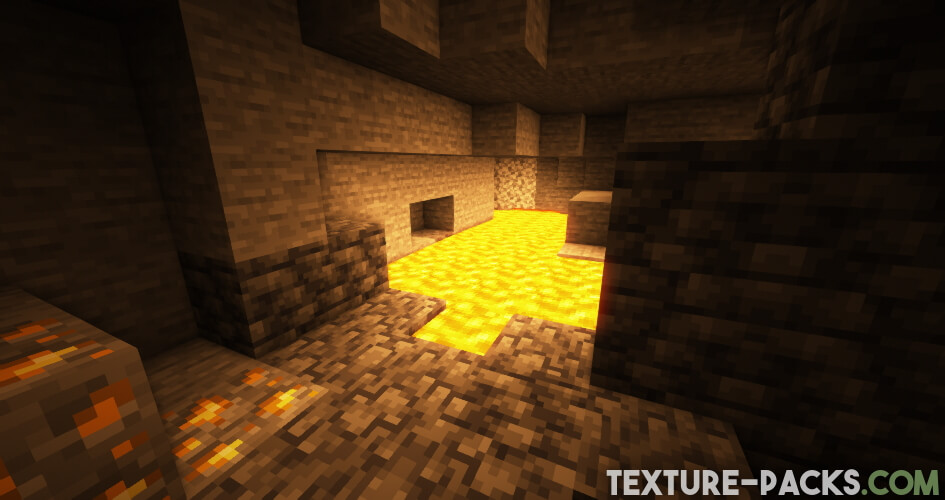
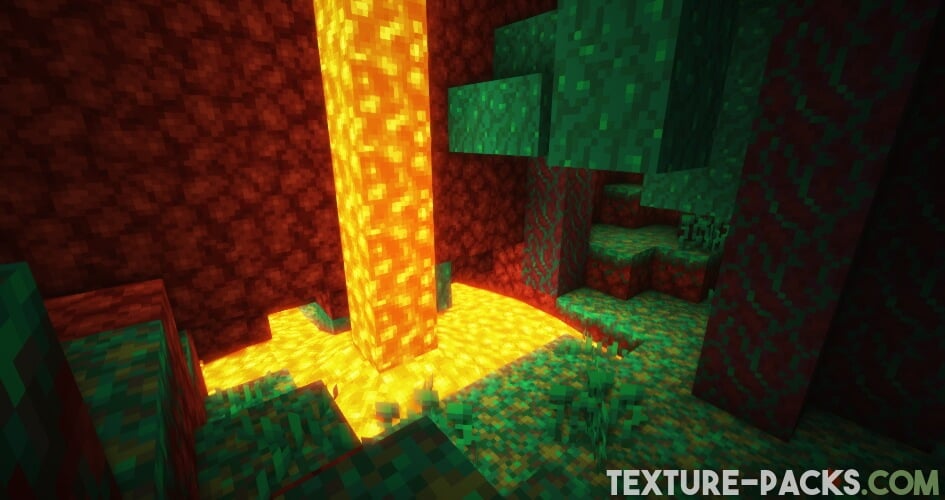
AstraLex shaders give Minecraft a whole new atmosphere, as you can see in the screenshots. Everything in your game world looks different. Everything from the sky to the water looks extremely realistic and shines very brightly. However, the new lighting also creates a problem. It is pitch black at night. So we recommend that you go to the shader options and make some changes to the lighting.
Furthermore, the creator LexBoosT writes that the pack was only tested in Minecraft Vanilla. As a consequence, there may be problems with mods. But according to our tests, this is rather the exception and the most popular modpacks should run without problems.
How To Install AstraLex Shaders
Here’s a tutorial on installing AstraLex in Minecraft Java Edition.
- Download the AstraLex shaders for Minecraft from the file section below. Pick the file that matches your Minecraft edition and version.
- Install Iris or OptiFine. The Iris mod is recommended for better performance with higher FPS.
- Open the Minecraft launcher, and choose the Iris or OptiFine profile you just made.
- Launch Minecraft.
- For Iris: Go to "Options", then "Video Settings", and select "Shader Packs". Next, click on "Open Shader Pack Folder" to access the shaderpacks folder. For OptiFine: Navigate to "Options", then "Video Settings", and click on "Shaders." Afterward, click on "Shaders Folder" to open the shaderpacks folder.
- Move the downloaded ZIP file into this folder (.minecraft\shaderpacks).
- In the game, choose the newly installed pack from the shaders list. If you select a shader pack using Iris, its filename will turn yellow.
- Click "Done" or "Apply" and all new features have been loaded.
Sometimes you may have problems with lags and errors in the beginning. A quick fix would be to set the render distance lower so that your graphics card has less to process. However, please read our section about the best settings further above. More troubleshooting can be found in the creator’s FAQ, which will surely help you. Nevertheless, more serious errors do happen, which are not due to a wrong installation and therefore not due to you. It’s best to let us know if you see something that doesn’t work properly.
AstraLex Shaders Download
Download AstraLex Shaders

how do i remove the wavy effect in the nether
The best thing I’ve ever seen in Minecraft
true
best shader in the world
bit over the top
any way to turn off the weird fuzzy motion blur?
I always tear up when seeing this it is too good if you want looks over realism
Very beautiful, wonderful shader
hi! I’ve downloaded astralex through iris and it works perfectly! however, I don’t like the look of the round sun and moon. so I turned it off in their settings but now I have none at all… can anyone tell me how I can get a square sun and moon back?
You won’t be able to make them square, unfortunately. At least I haven’t found such a setting. But you can disable those silly dancing cartoon rays.
When I am looking at the Astralex folder after downloading it keeps showing up as “shaders” and it won’t apply. Am I doing something wrong?
Dont unzip shader folders when adding them to your game, just put it in the shaders folder that is created with OptiFine 🙂
That usually happens because your browser is set to automatically unzip downloaded files. Shader packs like AstraLex must stay as a .zip file to work. Disable auto-unzipping, download it again, and place the ZIP in your Minecraft shaderpacks folder.
Ez no lag
this pack is the best one i ever used and i used a lot
6 chunks amd ryzen 5600x( something like that) and rtx 3070ti 40 fps
omg this shader pack is my first shader and its soo cool during that rainfall and night sky constitution and comets its so op
Hey i love your mod i feel like i want to know your face 😅
wtf ???
are there any bedrock or PE shaders?
i have playd a littel bit around with the shader and the red stone tourch dont make light when placed and all light things is stronge when hold the placed
What do I do if I don’t have optifine?
Alternatively, you can install Sodium and Iris Shaders.
what do i do if the game keeps crashing ?
Go to the shader settings and use the lowest astralex shader profile.
where is shader settings ?
Start Minecraft and go to options –> shaders –> shader options.
it is still crashing dosent even load game just crashes soon as i press play and new world and go soon as it gets to 100% it crashes?