You can alter the game’s appearance with Minecraft texture packs and introduce new elements. For instance, packs with higher resolutions enhance the visual appeal of your Minecraft world. However, certain limitations exist, as these packs cannot add new animals or items – that requires Minecraft mods. Ultimately, the goal is to tailor the overall design to match your preferences. This guide will walk you through the step-by-step process of how to download and install texture packs in the Minecraft Java Edition. By the way, this tutorial applies to the latest Minecraft update, older versions, and snapshot releases.
Downloading and installing texture packs for Minecraft might be a new concept for you. If that’s the case, rest assured, you’re not alone. We frequently receive messages and questions on this topic from parents, kids, and MC beginners. The installation process is quickly explained.
1) How To Download a Texture Pack
To start, select a Minecraft texture pack and download it. There are several websites offering textures. We recommend the best Minecraft Texture Packs list because most download links are free, providing you with a vast selection. All projects undergo thorough testing by our team and are widely used by thousands of players and popular YouTubers. A crucial tip is to always check the info box for compatible versions in every review article, as not all textures work with every game version.
Once you’ve found a texture pack you like, scroll down to the file section in one of our articles and download it. For this detailed guide, we’ll use Faithful 32x as an example. Save it on your desktop or download folder. The downloaded file must be a ZIP archive. Pay attention to this detail because viruses are often disguised as EXE or JAR files. You can always find the download links at the end of the reviews. Directly next to the links, you’ll find information about the Minecraft edition, resolution, and version. In most cases, your browser will start the download immediately when you click on a download link. Occasionally, you may be redirected to a third-party website, unfortunately, due to copyright reasons.
Next, press the “CTRL” + “J” keys simultaneously in your browser. This opens your download history. This keyboard shortcut worked in our tests seamlessly with Google Chrome, Mozilla Firefox, Microsoft Edge, and Opera. As an alternative, you can open the download folder on your PC.
2) Launch Minecraft
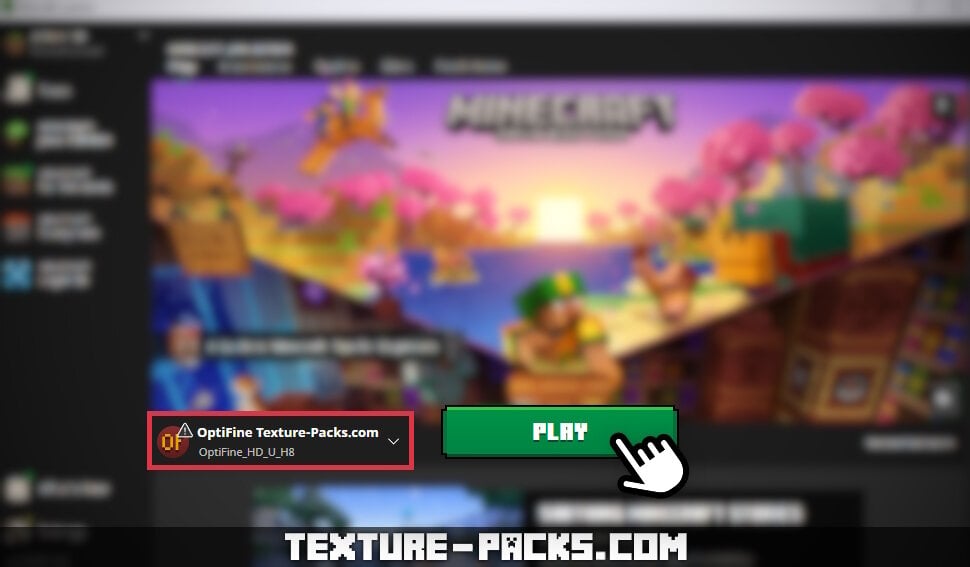
Now, start the Minecraft launcher. Ensure that you select a Minecraft installation profile that is compatible with your downloaded pack in step 1. Please note that most packs need OptiFine installed. We used OptiFine_HD_U_H8 for our guide, but you can also use other versions. If OptiFine isn’t available for your game version, you can skip it.
If you want to create a new profile, navigate to the “Installations” tab in the launcher and click on “New installation”. Provide a name for the installation, choose a game version, and click “Create”. Afterward, return to the “Play” tab at the top and select the new installation from the dropdown menu at the bottom left, which is highlighted in the screenshot. To start the game, click on the green “Play” button.
3) Accessing The Resource Pack Section
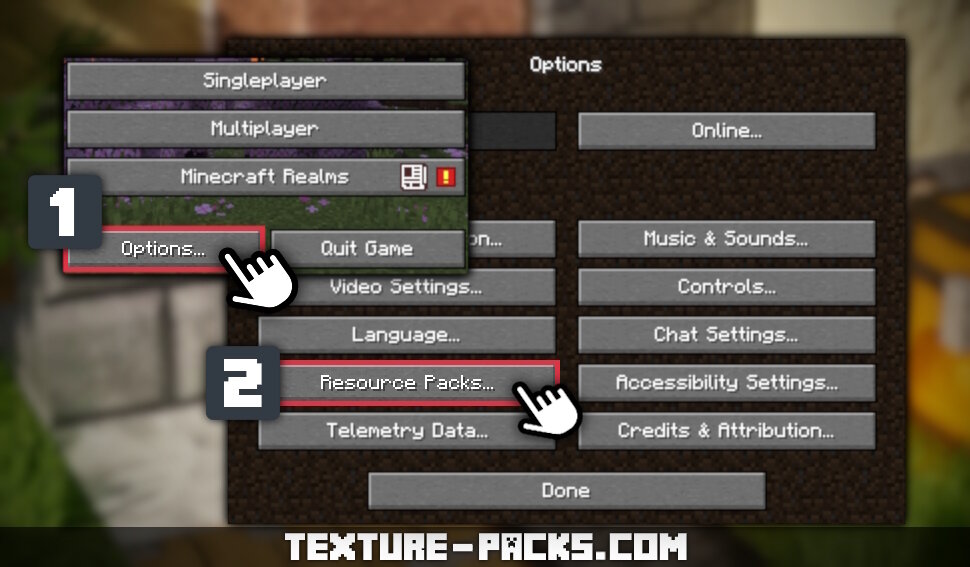
To access the resource pack section, click on “Options…” in the main menu. You will find the “Resource Packs…” option on the left side of the screen. Click on it to proceed. This step is essential to successfully install and activate your chosen texture pack within Minecraft. For a visual guide on performing these steps, refer to the accompanying screenshot.
4) How To Install a Texture Pack
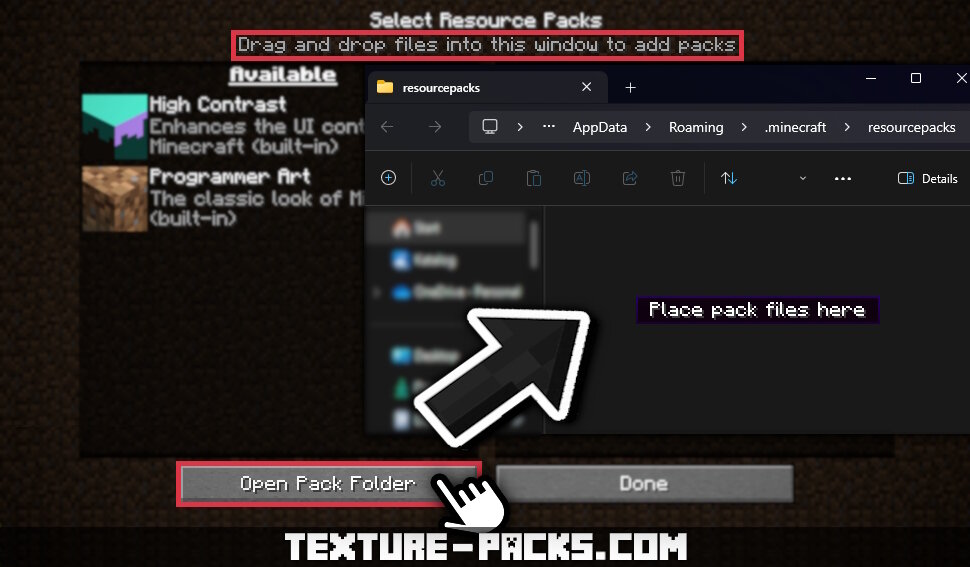
At this point, you are ready to learn how to install texture packs. Click on “Open Pack Folder” located at the bottom left. This action opens the folder named “resourcepacks”.
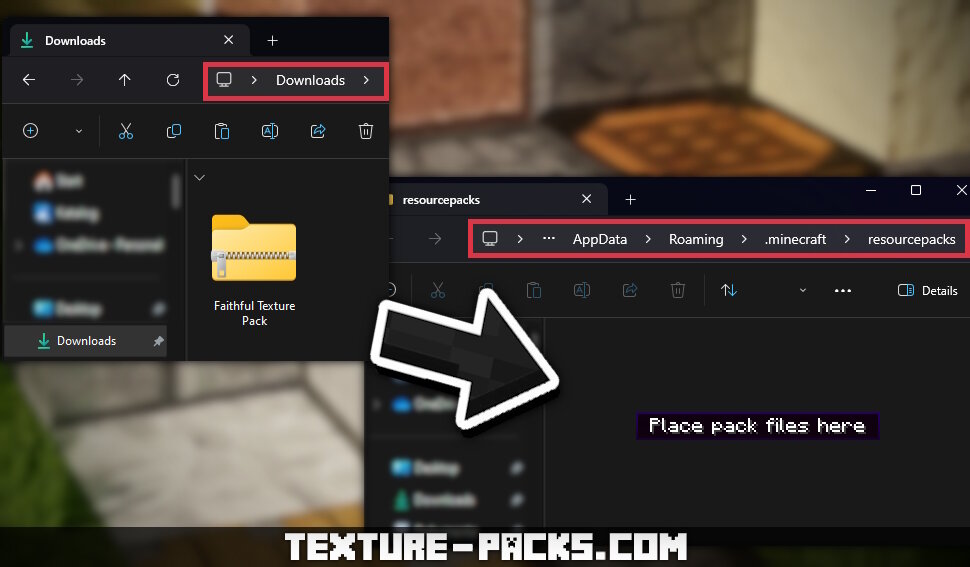
Copy the downloaded file from your web browser or download folder and paste it into the “resourcepacks” directory. Upon successful completion, you should now see the installed pack in Minecraft.
If it doesn’t show up, you may need to unzip the file. You can do this by right-clicking on the file and selecting “Extract All”. Optionally, you can use third-party software for unzipping texture files, although this process can be accomplished on Windows, macOS, and Linux without additional apps. As a rule of thumb, clicking on the texture pack file should reveal the “pack.png” and “pack.mcmeta” files with just one click. If not, the file structure may not be correct.
5) Activating a Texture Pack in Minecraft
After successfully installing the texture pack file without any errors, you can close the pack folder. The new texture pack will now appear in the left column of the Minecraft window. Hover your mouse over the pack’s image, and you’ll see a right-pointing arrow.
Click on this arrow to move the textures from “Available” to the “Selected” side. Double-check to ensure that the pack in the right column is positioned above the default textures. If not, the new assets won’t be visible in Minecraft. Finally, click on “Done” at the bottom right and you have successfully downloaded, installed, and activated a texture pack in Minecraft.
We’ve also created an in-depth video tutorial on how to download and install a texture pack for Minecraft Java Edition, walking you through each step visually. Watching the process in action can be incredibly helpful, especially for those who are new to installing texture packs.

Worked with the PvP pack I wanted to install
This guide helped me
me too!
me too too!