Before you can run Minecraft mods or certain modpacks, you need Java installed on your PC. Not Minecraft Java Edition, but the Java program itself that runs in the background. Without it, no mod launcher will work properly and .jar files simply won’t open. In this guide I’ll show you how to install Java in just a few minutes, with screenshots straight from my own PC.
Which Java Version Do You Need?
On the Oracle download page you’ll see several versions: JDK 26, JDK 25, and JDK 21. That can be confusing at first, and new versions keep getting added over time. JDK 26 is the latest release but not a Long-Term Support release yet. JDK 25 is the newest LTS release (Long-Term Support), meaning it will receive updates for a long time. JDK 21 is the previous LTS release and still a solid option if a specific modpack requires it.
My recommendation: go with JDK 25. It’s free, stable, and works with all current Minecraft versions.
Step 1: Go to the Java Download Page
Open your browser and head to the official Oracle page:
👉 https://www.oracle.com/java/technologies/downloads/
You’ll land on Oracle’s Java Downloads page. This is the official, safe source; no third-party sites are needed.

Step 2: Select JDK 25 and Switch to Your Operating System
On the page you’ll see three tabs: JDK 26, JDK 25, and JDK 21. Click on JDK 25.
Right below that, you’ll see tabs for your operating system: Linux, macOS, and Windows. Just click on whichever one applies to you. I’m on Windows, so that’s what I’ll select.
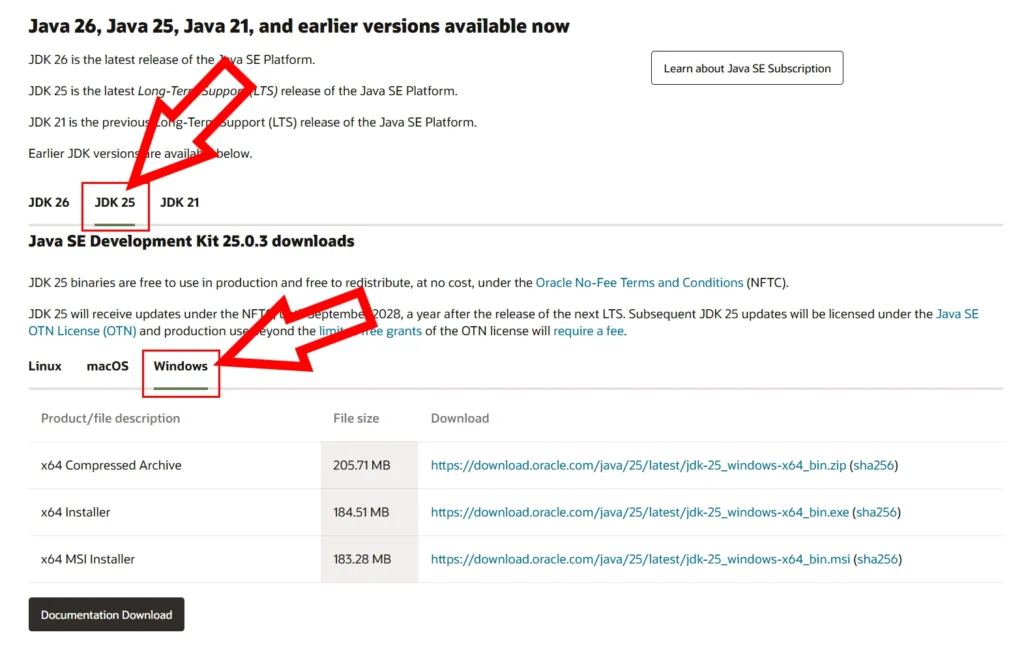
Step 3: Download the Right Installer
You’ll now see a small table with different download options. For a standard Windows PC, grab the x64 Installer, which is a simple .exe file that installs just like any other program. x64 stands for 64-bit, and practically every modern Windows PC running Windows 10 or later is 64-bit.
Click the link next to it to start the download. The file is around 185 MB. For macOS and Linux, just switch to the corresponding tab above and download the matching installer. The process is the same.

Step 4: Run the Installer
Open the downloaded file, usually in your Downloads folder. Windows may ask if you want to allow the app to make changes to your device. Click Yes.
The installation wizard will open. Just click Next.

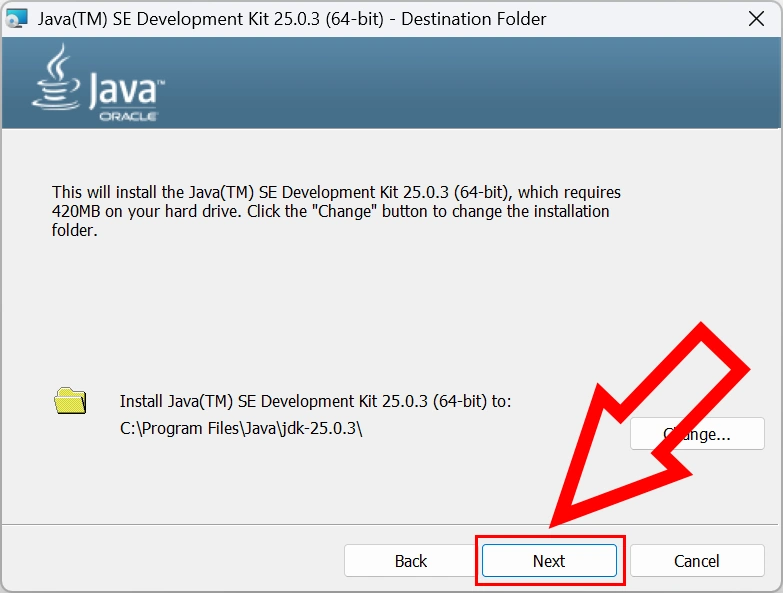
Step 5: Confirm the Destination Folder
The next screen shows you where Java will be installed, by default at C:\Program Files\Java\jdk-25.0.3\. You don’t need to change anything here. Just click Next. The installation will run through on its own and usually takes less than a minute.
Step 6: Finish the Installation
Once the installation is complete, you’ll see the “Successfully Installed” window. Click Close and you’re done. Java is now installed on your PC.

Why Does Minecraft Need Java?
Minecraft Java Edition is written entirely in the Java programming language. The game itself is essentially one large .jar file that needs Java to run, similar to how a French document needs someone who speaks French to read it.
Modern launchers like the official Minecraft Launcher have bundled their own Java for a while now. But as soon as you start using mods, modpacks, or third-party mod launchers, you’ll need Java installed separately, otherwise many tools simply won’t cooperate.
Common Issues and How to Fix Them
.jar Files Open With WinRAR (or Don’t Open at All):
This is by far the most common issue after installing Java. Windows doesn’t know that .jar files should be opened with Java, so it associates them with WinRAR, 7-Zip, or another program instead. Here’s how to fix it:
- Right-click any .jar file (mods always use this file type)
- Click “Open with” then “Choose another app”
- Scroll down and click “More apps”
- Select Java(TM) Platform SE binary from the list
- Check “Always use this app” and click OK
“Java Not Found” in the Mod Launcher:
Restart your PC after the installation. This fixes the problem in most cases because Windows only updates its environment variables after a reboot.
Frequently Asked Questions
Yes, if you’re using mod loaders like Fabric, NeoForge, Forge, or Quilt. These require Java to be installed and properly configured on your system.
Yes. Oracle provides Java free of charge for personal use, so no need to worry about any hidden costs.
Yes, that’s no problem at all. Some modpacks require Java 21 instead of 25, for example. You can install both side by side and select the right version in your Minecraft launcher settings.

is verry good